MAME: 0.280 - Released: 2025-08-29T21:26:57 - Machines: 48893 - rom: 364836 - disk: 1378 - Lists: 731 - Software: 139884 - rom: 236863 - disk: 11396
Spludlow MHS (MAME Hash Store) is depreciated
Please use the contact form if you have any questions.
MHS functionallity is now provided by MAME-AO on GitHub.
Contents
MHS Introduction. 1
MHS Software. 1
Installation. 1
Source Code. 1
Building Spludlow MHS from source code. 1
Prerequisites. 1
Other Software. 1
Microsoft .net. 1
Permission to create symbolic links. 1
Recommended Disk Layout scheme. 1
Disable Windows Defender Realtime
protection. 1
Initial Configuration. 1
Extract binaries and perform basic
configuration. 1
Download the current MAME database. 1
Import Machine ROMs. 1
Import an update. 1
Create Machine ROM links. 1
Importing Machine Disks and Software
List ROM & Disks. 1
Performing the monthly MAME update. 1
Notes: MHS Menu Operations. 1
Configuration. 1
Database. 1
Import. 1
Link. 1
Export. 1
Verify. 1
Clean. 1
Reports. 1
Notes: MHS Reports. 1
Notes: Disk space. 1
Notes: Software List Disk total sizes. 1
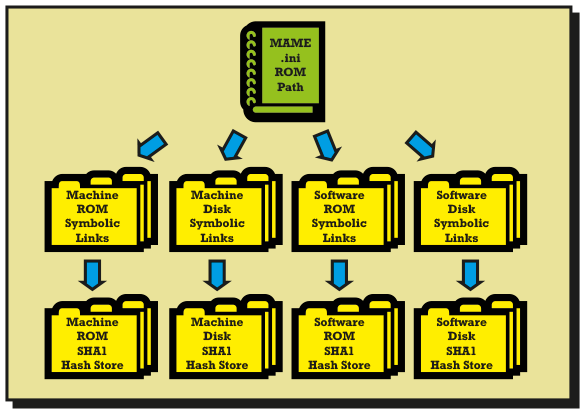
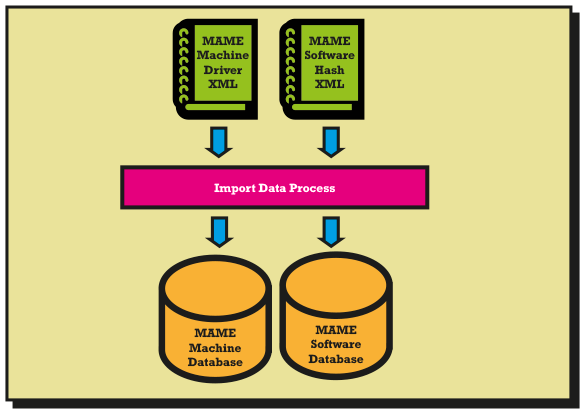
The MAME Hash Store (MHS) is a strategy and piece of
software to help you manage MAME ROM and disk (CHD) files for machines and
software lists.
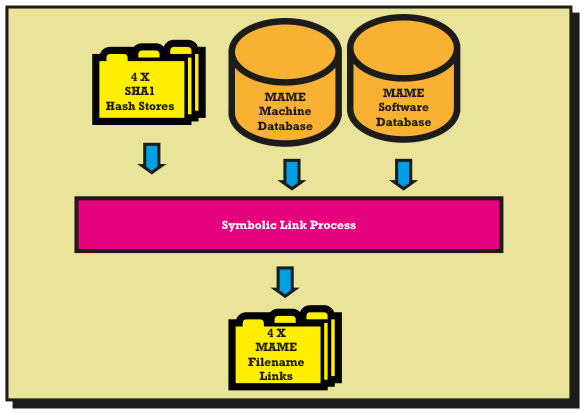
Instead of storing your ROM and Disks in the MAME format
they are stored and named as the SHA1 hash for the filename in a “hash store”.
There are 4 hash stores, ROM and disk for machine and
software lists.
So MAME can find the files symbolic links are used that
point to the files in the hash stores. (A symbolic link is a file that takes up
no disk space that points to a real file).
This makes it very easy to maintain the hash stores, for
each MAME release you instantly know which files you require and what you no
longer need.
The hash store doesn’t need indexing or any record keeping
of what’s in them, simply the filenames are the SHA1 hashes of what you have.
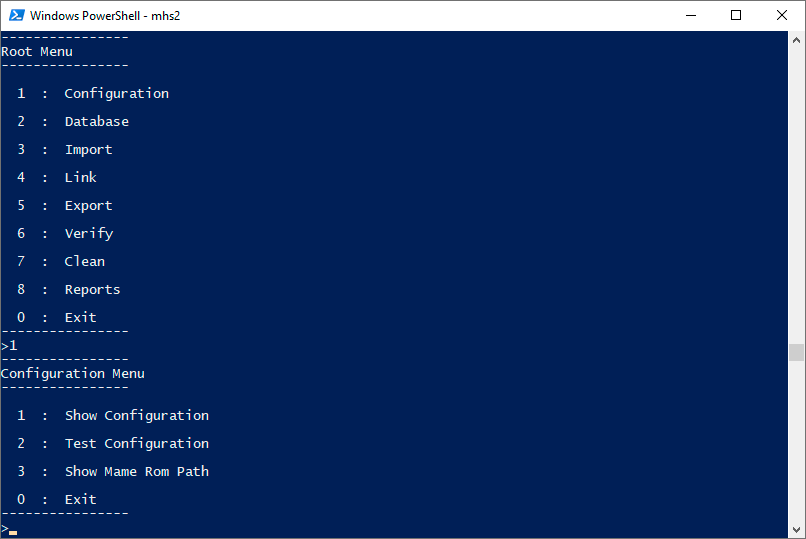
The UI for MHS is a simple Windows .net console application,
you can choose from various options. Some options require input, shown in
square brackets.
There is current no installer, you have download and extract
the binary archive.
Click here
to download the Spludlow MHS binary archive (V 1.14).
You
can download the source code with VS .net projects here.
Click
here to casually browse the source code to see what it does.
MHS consists of the following Visual Studio Projects, build
them and put everything in same directory.
·
Spludlow.dll – Spludlow class library.
·
Spludlow.Html.dll – Wrapper for HtmlAgilityPack.dll, used for
extracting links to download from MAME site.
·
Spludlow.Data.SQLite.dll – Wrapper for System.Data.SQLite.dll,
the database used.
·
Spludlow-Proces.exe – A generic console application, process used
to host the HMS application.
·
Spludlow.Mame.dll – All the MHS code.
Other bits required in same directory are:
·
DataTypes.txt – Required by the Spludlow DAL (Data access layer)
·
MHS.bat – Launches the application, contains the entry point.
·
MHS.txt – The Configuration for MHS
·
SQLite.Interop.dll – Required by System.Data.SQLite.dll
7-Zip is required to be installed.
Ensure you are running the latest (V4.8) .net, On window 10
run windows update, for server OS you may need to manually install the latest.
Allow on Target Computer
To be able to create symbolic links, used by MHS, you have
to grant permission.
Run “gpedit”
Go to “Computer Configuration\Windows Settings\Security
Settings\Local Policies\User Rights Assignment\Create symbolic links”
Add the required user or group. You will need to re-start
for settings to take effect.
NOTE: If you are creating links on a file share on another
computer you will have to grant permission on that computer.
Allow on Client Computer
If you using links on a file share (not the local computer)
you have to run the following commands on the client computer (Not necessary
the computer providing the file share):
Remote to Local: “fsutil behavior set symlinkEvaluation
R2L:1”
Remote to Remote: “fsutil behavior set symlinkEvaluation
R2R:1”
You can check the settings with “fsutil behavior query
symlinkEvaluation”
No reboot is required for this.
When dealing if relatively large amounts of data it makes
sense to have multiple disks available.
Performing read and write operations at the same time on a
single drive will drastically reduce performance.
The recommended layout with MHS is to use 3 sperate disks,
with 2 partitions on the MHS store disk.
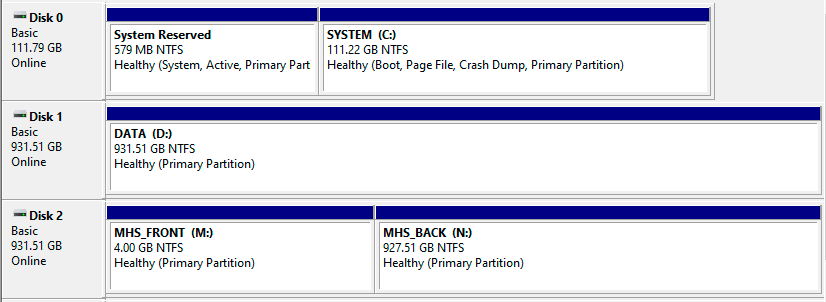
The partitions:
·
SYSTEM (C:) The system, user temp files, archive downloads (if
space available).
·
DATA (D:) Work area to extract archives to. MHS Import and export
operations should target this drive.
·
MHS_FRONT (M:) Small (2 – 4 GB) Partition just for links, format
and re-create links on each release (fast and keep filesystem clean).
·
MHS_BACK (N:) The 4 MHS hash stores, remainder of disk.
Data should always flow from one drive to another
·
Download archives – network => C: SYSTEM (Downloads/Desktop)
·
Extract archive – C: SYSTEM => D: DATA
·
MHS Import (ROM) – D: DATA => C: SYSTEM Temp => N: MHS
Store
·
MHS Import (DISK) – D: DATA => N: MHS Store
Disk drive notes:
·
If your C drive is too small you can download archives to N then
delete them after extracting to D.
·
Any archives in the import are extracted to system temp, so
ensure there is enough space on C, the biggest ROM I’ve seen is “hapyfsh2” when
extracted from the ZIP is 4.12GB.
·
CHD Files are copied directly, they don’t go via temp (provided
they are not in archives).
·
Although you can import large single archives containing CHD and
ZIPs its recommended you extract them first to the import directory.
·
CHDs in single or multiple part archives should be extracted
manually into the import directory, you can leave ROM ZIPS as they are.
When performing MHS import and export operations it is
recommended you disable real time protection.
Realtime protection will slow down file systems operations
and some of the PC software lists ROMs contain PC viruses and defender may well
delete them, this will mess things up when processing.
In the Windows Task scheduler go to “\Microsoft\Windows\Windows
Defender” and disable all of the actions.
Switch off everything you can in the Windows Defender UI.
NOTE: Windows will automatically switch everything back on
at some point, but this should at least keep it off until the next re-boot.
NOTE: As of January 2020 permanently switching off real-time
protection in group policy (gpedit) no longer seems to work.
The guide assumes you are using the recommended disk schema
C, D, M, N if not you will have to substitute the necessary drive letters.
NOTE: The timings are from testing on 2009 hardware, they
are worst case, expect current hardware to be significantly quicker.
NOTE: The initial database setup will use around 4GB of RAM,
if your host only has 4GB I would recommend rebooting before starting and
ensure nothing else is using RAM.
This will need doing once before you can do anything else.
·
Ensure perquisites met: 7-Zip installed and permission for user
to create symbolic links.
·
Download the MAME binaries archive https://www.mamedev.org/release.php
·
Extract MAME binaries to D:\MAME_BIN (Ensure path to “D:\MAME_BIN\chdman.exe”
i.e. no unwanted subfolders)
·
Download the MHS archive https://mame.spludlow.co.uk/Downloads/Spludlow-MHS-V1.14.7z
·
Extract MHS to D:\MHS (Ensure path to “D:\MHS\MHS.txt” i.e. no
unwanted subfolders)
·
Start a command prompt search for “cmd” (You don’t need
Administrator) you may want to pin to taskbar.
·
Select the D drive “D:”
·
Change to MAME directory “cd D:\MAME_BIN”
·
Create a fresh MAME configuration file (mame.ini) “mame64.exe
-createconfig”
·
Change to MHS directory “cd D:\MHS”
·
Edit the file “D:\MHS\MHS.txt” with notepad and ensure the paths
are correct for your disk layout.
·
Start MHS “mhs.bat”
·
Go into the “Configuration” menu
·
Select “Show Configuration”, ensure all the paths look correct.
·
Select “Test Configuration”, ensure no errors displayed, fix
“D:\MHS\MHS.txt” if necessary and test again.
·
Select “Show MAME Rom Path”, copy the line and use notepad to put
into “D:\MAME_BIN\mame.ini” rompath (replacing “roms”)
NOTE: Whenever making configuration changes to “MHS.txt”
you should completely exit the program and re-start it with “MHS.bat”.
This will need doing initially and then on each MAME release.
There 2 databases (machine & software) are both obtained
from the MAME binary archive it will be downloaded from https://www.mamedev.org/release.php.
The downloaded archive will be left in the data directory.
Perform the following steps:
·
Go into the “Database” menu.
·
Select “Import Database” may take up to 10 minutes and use 4GB
RAM.
·
Select “Import Database” again should show that the 2 databases
are on the current MAME version.
·
Select “Report all database” this will dump the 4 main datasets
to “D:\MHS\Reports” have a look if you want.
Here we will import a machine ROM collection from a few
releases back so it won’t be 100% complete, until we load updates in the next
step.

Archives (ZIP, RAR) files will be extracted to temp
directory, if the extension is “.CHD” it will be treated as a disk otherwise it
will be treated as a ROM. For ROM files the SHA1 is calculated and if needed it
will be imported. For Disk files “chdman info” is run against the file to find
the SHA1, if required then “chdman verify” is ran and the file imported.
Perform the following steps:
·
Have a directory on the D drive with a collection of machine Rom
ZIPs
·
Go into the “Import” menu.
·
Select “Summary Report”.
·
Open the last html file in “D:\MHS\Reports” it should show
everything at 0%.
·
Select “Import files [Import Directory]”
·
Enter the path of the rom collection “D:\INCOMING\MAME ROMs 0.216
2019-11”
·
Wait up to 1 hour 20 minutes
·
Select “Summary Report” again.
·
Open the last html file in “D:\MHS\Reports” it should now show
“Machine Rom” at 99.479 %.
You would typically perform this step after each MAME
release.
·
Download the monthly MAME update ZIP
·
Extract the ZIP to “D:\MHS_IMPORT” (default import directory)
·
Go into the “Import” menu.
·
Select “Summary Report”. For doing a before and after.
·
Select “Import files”
·
Wait up to 30 minutes.
·
Select “Summary Report” again.
·
Compare the before and after reports.
·
You can now clear the import directory.
·
Continue these steps for further updates.
MAME expects the files to be named correctly. Normally for ROM
files they are in a ZIP but here everything is a file in directories.
If you have started with a fairly complete ROM set and
imported all updates up to current, you should have 100% Machine ROMs.
Now it is time to create the symbolic links MAME requires
that will point to the files in the hash store.
If you’re not at 100% you can still do this it will only
create links for the files it has.
NOTE: Creating links expects no existing links in place, its
faster to format the link partition and just re-create all of them on each
release.
·
Go into the “Links” menu.
·
Select “Link Machine Rom” wait up to 4 minutes.
·
Go and look in “M:\MameFront\MameLink\MachineRom” if you’re
interested.
·
Run MAME and try a machine ROM game like “mrdo”

You can perform the same actions for all 4 MHS stores,
remember to create the links after importing.
When importing CHD you have the “No Disk Verify” option this
will prevent a chdman verify so the import is just a copy rather than SHA1
hashing the file and then copying it. You can verify in the store later if you
want.

MAME updates occur monthly, this means ROM and disks can be
added, removed, replaced, or have filenames changed.
To update the MHS databases and hash stores perform the
following steps:
·
Obtain the monthly update archive containing the new ROMs and
disks for the release.
·
Extract the archive to “D:\MHS_IMPORT”, ROMs should remain in ZIPS,
disk files as .CHD files (not in archives).
·
Go into the “Database” menu.
·
Select “Import Database”.
·
Wait for the process to complete, you can look in “D:\MHS\Data”
notice the new MAME binary archive is downloaded, the 2 XML files extracted,
and the 2 SQLite databases are re-created.
·
Go into the “Reports Menu”.
·
Select “Summary Report”.
·
You may also want to run the “Software Disk by List” report.
·
Look at the reports in “D:\MHS\Reports” you will notice things
have changed you have missing and unused ROMs and disks.
·
You can run any of the “Missing” reports to get details of what
exactly is missing.
·
Go into the “Import” menu.
·
Select “Import files” to import the update files extracted
previously, wait for the import to complete.
·
You can look at the import report in “D:\MHS\Reports”.
·
Select the “Summary Report” again. Hopefully the update contained
everything the release required.
·
If anything is missing run the appropriate “Missing” report and
hunt down the required files.
·
You may have noticed in the summary report there are now unused
files.
·
Go into the “Clean” menu.
·
Select “Clean All”.
·
Run the “Summary Report” again, the unused files and gone.
To update the MHS symbolic links perform the following
steps:
·
Format the M: Drive “MHS_FRONT” partition.
·
Go into the “Link” menu.
·
Select “Link All” and wait for all the links to be created.
Update MAME binaries
·
Delete or move the old MAME binaries folder “D:\MAME_BIN”
·
Create an empty “D:\MAME_BIN” directory
·
Extract the MAME binaries archive in “D:\MHS\Data” to the “D:\MAME_BIN”
directory.
·
Configure the MAME rom path as described in the Initial
Configuration instructions, in the “Configuration” menu select “Show Mame Rom
Path”.
You should now be fully up to date, have a look at the MAME
“What’s New” file for the release try some new working machines and software
list additions.
All configuration, for directory locations, is loaded from
the file “MHS.txt” in the current directory, it requires manually editing (see
comment in file) before running MHS.
·
Show Configuration – Display the current configuration
·
Test Configuration – Directories will be created if not
present, write file and link tests will be performed if required, the binaries
directory is checked for the presence of chdman.exe
·
Show MAME Rom Path – Display the rom path to be used in
the INI or passed as a parameter for MAME.
There are 2 (machine & software) SQLite databases,
populated from files on the official MAME site https://www.mamedev.org/release.html.
·
Import Database – Check the MAME site and download and
update the databases if required. You would typically do this on each release.
·
Report All Database – Dump reports of the 4 main data
sets; ROM & Disk for Machine & Software.
Files that are required will be imported into the store.
Archives (ZIP & RAR) will be extracted recursively, using the user’s
temporary directory.
·
Summary Report – Quick glance of how complete the 4 stores
are.
·
Import Files – Import files from the directory in
Configuration
·
Import Files (No Disk Verify) – Import files from the
directory in Configuration (Don’t perform CHD hash validation)
·
Import Files [Import Directory] – Import files from a
specified directory
·
Import Files (No Disk Verify) [Import Directory] – Import
files from a specified directory (Don’t perform CHD hash validation)
Create the symbolic links from the filenames MAME expects to
the ROM and Disk files in the 4 hash stores. On each release you would
typically format a small (2 to 4 GB) link partition then re-create all the
links, they should take minutes to create.
·
Link All
·
Link Machine Rom
·
Link Machine Disk
·
Link Software Rom
·
Link Software Disk
Write out the MAME normal way of storing files, ROM (all in .ZIPs)
and Disk (.CHD).
·
Export Machine Rom All
·
Export Machine Rom [Machine Name]
·
Export Machine Disk All
·
Export Machine Disk [Machine Name]
·
Export Software Rom All
·
Export Software Rom [Software List Name]
·
Export Software Disk All
·
Export Software Disk [Software List Name]
Confirm existing Rom and Disk files in store a valid (SHA1
checks out). If you have any concern about store integrity you may want to run
a verify.
·
Verify Machine Rom – Perform SHA1 hash of Rom and compare
to store name
·
Verify Machine Disk – Perform SHA1 hash of Disk, using
chdman.exe and compare to store name
·
Check (Fast) Machine Disk – Get SHA1 of Disk, using
chdman.exe and compare to store name
·
Verify Software Rom – Perform SHA1 hash of Rom and compare
to store name
·
Verify Software Disk – Perform SHA1 hash of Disk, using
chdman.exe and compare to store name
·
Check (Fast) Software Disk – Get SHA1 of Disk, using
chdman.exe and compare to store name
With each MAME release Rom and Disk files get updated /
replaced, the old versions can be permanently deleted.
·
Summary Report – Quick glance of how many unrequired files
are in the 4 stores.
·
Clean All – Remove all unrequired files from all the 4
stores
·
Clean Machine Rom
·
Clean Machine Disk
·
Clean Software Rom
·
Clean Software Disk
To get a grip on things several reports are available
·
Summary Report
·
Missing Machine Rom
·
Missing Machine Disk
·
Missing Software Rom
·
Missing Software Disk
·
Software Disk by List
·
CHD…
·
Silly Names Report
Many MHS operation, including running reports save files to
the “Reports” directory in the “MHS”, a HTML file and a text file.
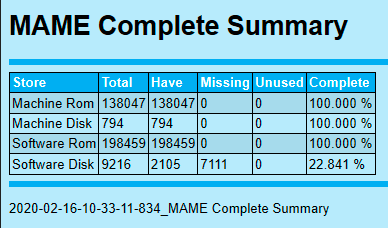
HTML are the easiest to view but sometimes are too big to
display in a browser (in this day and age and everything?)
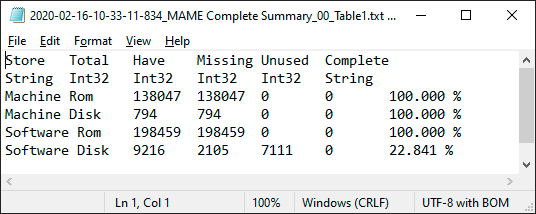
The text files are TAB delimited and can be easily viewed
(and searched) in notepad, although column alignment can be a problem viewing.
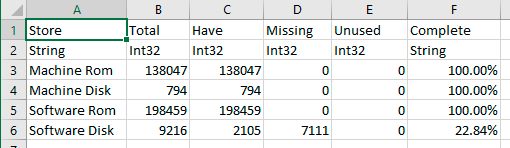
In notepad you select all CRTL-A, copy CTRL-C, and then
paste CTRL-V into Excel you can view easily and sort columns and such.
These are approximate total sizes for MAME ROMs and Disks,
these will only go up over time. You should leave some head room.
0.247
|
Store
|
Approximate Total Size
|
|
Machine ROMs
|
150 GB
|
|
Machine Disks
|
917 GB
|
|
Software ROMs
|
150 GB
|
|
Software Disks
|
2 - 3 TB
|
|
Links
|
< 2 GB
|
|
Binaries
|
500 MB
|
ROMs are uncompressed, you get around 50% compression when
they are in ZIP archives, like when stored in the traditional way. Disks are
all in CHDs that are already compressed.
A simple way of looking at disk allocation is everything
except Software Disks would fit in 2 TB. Depending on how many Software Disks
you want to collect then allocate accordingly (see table below).
Projected disk space requirements for the various software
lists disk collections.
0.247
|
Software List
|
Projected Size
|
Accuracy
|
|
3do_m2
|
704 Megabytes (MB)
|
100
|
|
abc800_hdd
|
1.1 Kilobytes (KB)
|
100
|
|
amiga_hdd
|
5.4 Megabytes (MB)
|
100
|
|
amiga_workbench
|
434 Megabytes (MB)
|
100
|
|
archimedes_hdd
|
566 Kilobytes (KB)
|
100
|
|
bbc_hdd
|
19 Megabytes (MB)
|
100
|
|
cd32
|
12 Gigabytes (GB)
|
100
|
|
cdi
|
171 Gigabytes (GB)
|
100
|
|
cdtv
|
18 Gigabytes (GB)
|
100
|
|
dc
|
262 Gigabytes (GB)
|
2
|
|
fmtowns_cd
|
137 Gigabytes (GB)
|
87
|
|
gtfore
|
2.1 Gigabytes (GB)
|
100
|
|
hp9k3xx_cdrom
|
1.3 Gigabytes (GB)
|
100
|
|
hp9k3xx_hdd
|
65 Megabytes (MB)
|
100
|
|
hyperscan
|
396 Megabytes (MB)
|
100
|
|
ibm5150_hdd
|
7.5 Megabytes (MB)
|
100
|
|
ibm5170_cdrom
|
71 Gigabytes (GB)
|
23
|
|
ibm5170_hdd
|
230 Megabytes (MB)
|
100
|
|
interpro
|
2.0 Gigabytes (GB)
|
100
|
|
jazz
|
119 Megabytes (MB)
|
100
|
|
kpython2
|
28 Gigabytes (GB)
|
100
|
|
mac_hdd
|
103 Megabytes (MB)
|
100
|
|
megacd
|
37 Gigabytes (GB)
|
100
|
|
megacdj
|
28 Gigabytes (GB)
|
100
|
|
mtx_hdd
|
68 Megabytes (MB)
|
100
|
|
neocd
|
29 Gigabytes (GB)
|
100
|
|
next_cdrom
|
1.0 Gigabytes (GB)
|
100
|
|
next_hdd
|
884 Megabytes (MB)
|
100
|
|
nuon
|
5.8 Gigabytes (GB)
|
100
|
|
pc1512_hdd
|
733 Kilobytes (KB)
|
100
|
|
pc1640_hdd
|
705 Kilobytes (KB)
|
100
|
|
pc8801_cdrom
|
288 Megabytes (MB)
|
100
|
|
pc98_cd
|
52 Gigabytes (GB)
|
38
|
|
pcecd
|
111 Gigabytes (GB)
|
100
|
|
pcfx
|
4.7 Gigabytes (GB)
|
100
|
|
pet_hdd
|
12 Kilobytes (KB)
|
100
|
|
pico
|
167 Megabytes (MB)
|
100
|
|
pippin
|
19 Gigabytes (GB)
|
100
|
|
psx
|
749 Gigabytes (GB)
|
0
|
|
saturn
|
451 Gigabytes (GB)
|
0
|
|
segacd
|
55 Gigabytes (GB)
|
92
|
|
sgi_mips
|
137 Gigabytes (GB)
|
100
|
|
sgi_mips_hdd
|
1.8 Gigabytes (GB)
|
100
|
|
snes_vkun
|
78 Megabytes (MB)
|
100
|
|
softbox
|
10 Kilobytes (KB)
|
100
|
|
v1050_hdd
|
46 Kilobytes (KB)
|
100
|
|
vis
|
7.7 Gigabytes (GB)
|
100
|
|
vsmile_cd
|
5.7 Gigabytes (GB)
|
100
|
|
|
2.3 Terabytes (TB)
|
|